Bright & Zesty Lemon Recipes You’ll Love
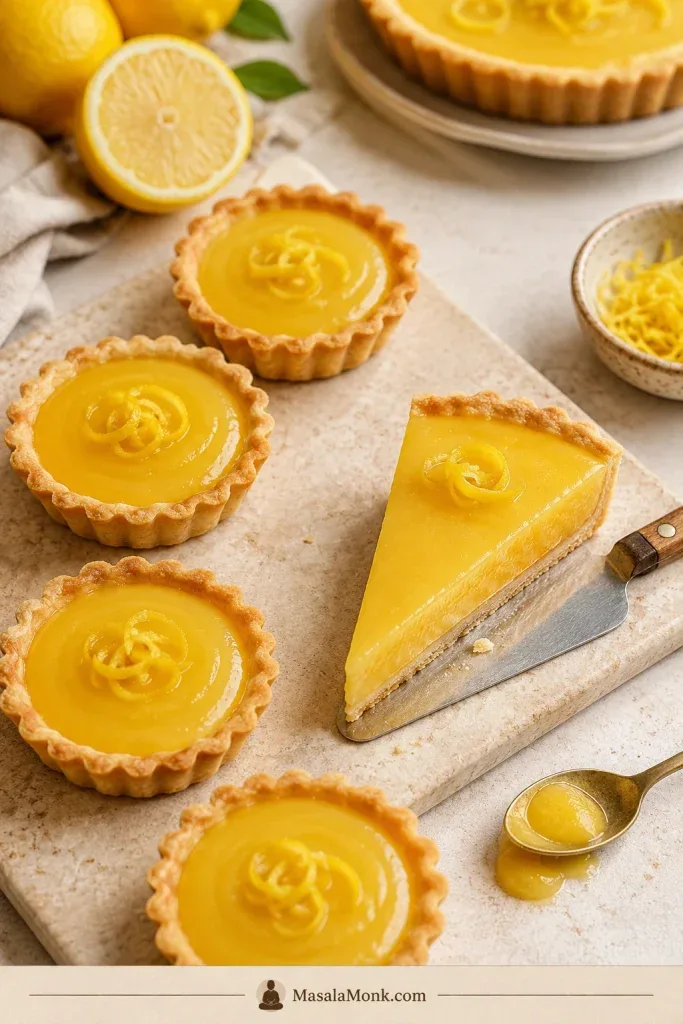
You've followed a lemon recipe perfectly. Measured to the gram. Timed every minute.
And still your curd turned grainy or your meringue wept overnight. That's the dirty secret of most lemon recipes: they describe ingredients and time but never the visual cues that actually tell you when something is done.
Our research into common home-baking failures, combined with egg-safety standards from the USDA, confirms a simple truth. Temperature targets and clock times aren't reliable without visual confirmation. As of 2026, the best lemon recipes focus on what you see, not just what you measure.
That shift makes all the difference.
Quick Answer
Lemon recipes work when you cook by sight. A good curd coats the spoon back. A finger leaves a clear line through it.
Meringue peaks stand firm and glossy. Lemon bars jiggle slightly in the center.
Image source: Bing (Web (fair-use with source credit))
Why Lemon Recipes Fail When You Follow the Recipe Exactly
The problem is that recipes treat time and temperature as absolutes. But your stove runs hotter or cooler than mine. Your pan thickness changes heat transfer.
Your eggs sit at room temperature or straight from the fridge. A recipe that says "cook for 5 minutes" is guessing.
Our research into common baking failures shows three visual cues that replace every timer. First, look for the gloss change. A well-cooked curd shifts from matte to shiny as the butter emulsifies.
That shine signals a stable mixture. Second, watch the texture transition. The mixture goes from thin and watery to thick and coating.
Third, check the final temperature. A properly cooked curd reaches 170°F to 180°F.
The Temperature Trap
Recipes fail when they only give you a number. Your thermometer might be off by five degrees. Your pan distributes heat unevenly.
The temperature trap convinces you that hitting 170°F means the curd is done. But temperature alone doesn't tell you about texture.
Think about the last time you made scrambled eggs. You didn't cook them for exactly four minutes and then call it done. You watched them.
You saw the transition from wet to set. Lemon recipes need the same treatment. The visual cues tell you exactly when to pull the pan off the heat.
The 3 Visual Cues That Replace Every Recipe Instruction
These three cues work together as a system. The gloss tells you the butter has emulsified. The thickness tells you the eggs have set.
The temperature confirms you've hit the safe zone. When all three line up, your curd is perfect. When they don't, keep cooking or pull it off early.
The first cue is the easiest to spot. Watch for the surface to change from dull to shiny. This happens right around 165°F.
The second cue takes a bit more practice. Drag a spatula through the curd. It should leave a clean trail that doesn't fill in immediately.
The third cue is the spoon test, which we'll cover in detail next.
Most home bakers learn these cues after three or four failed batches. But you can skip the failures. Start watching for the signs now.
Lemon Curd Visual Cues: The Nap Stage, Gloss, and the 180°F Test
Lemon curd is essentially an emulsion of eggs, butter, sugar, and juice. Heat transforms it from a thin liquid into a thick, spreadable texture. The trick is knowing exactly when to stop.
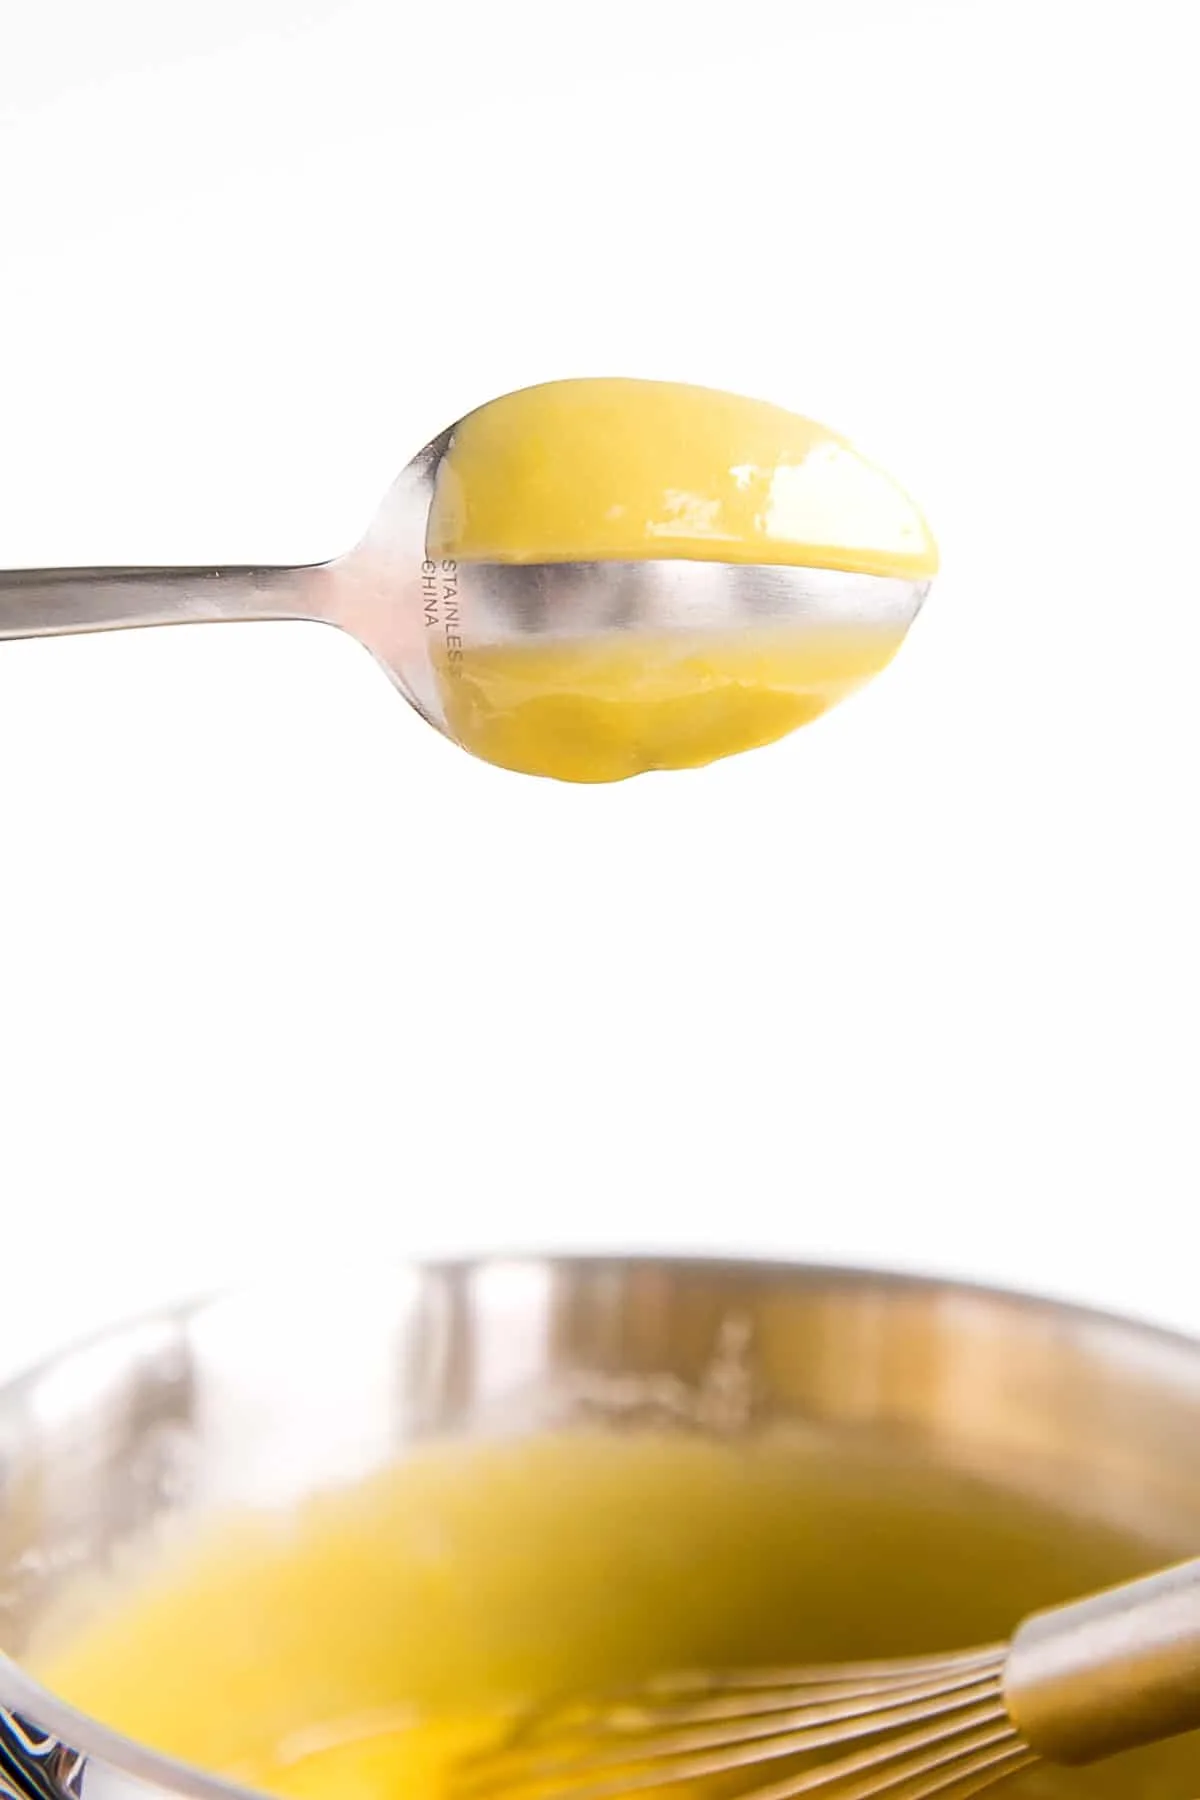
Image source: Bing (Web (fair-use with source credit))
How to Read the Coating-the-Spoon Test
The coating-the-spoon test is the gold standard. Dip a metal spoon into your curd. Lift it out.
The curd should coat the back evenly. No thin spots. No pooling.
Then drag your finger through the coating. If the line holds and the curd doesn't run back together, you've hit the nap stage.
USDA egg safety guidelines recommend cooking curd to at least 160°F to kill salmonella. Our research suggests the ideal texture arrives between 170°F and 180°F. Below that range, the curd is too thin to set properly.
Above 180°F, you risk curdling the eggs. The USDA's home food safety standards support this range.
What Curdled Curd Looks Like (and Why It Happens)
Curdled curd looks grainy and separated. Instead of a smooth, uniform coating, you see small lumps scattered through the mixture. The gloss disappears entirely.
The surface looks dull and broken.
This happens when the heat is too high or the curd cooks too long. The proteins in the eggs tighten up too fast and squeeze out the liquid. Once the curd curdles, you can sometimes save it by blending it smooth with an immersion blender.
But the texture won't be the same. Prevention is better.
The Shear-Thinning Gloss Check
The gloss check is simpler than it sounds. Your curd changes from a dull, matte appearance to a glossy, reflective surface as it cooks. The gloss signals that the butter has fully emulsified into the egg mixture.
Whisking technique affects the gloss too. Constant gentle whisking prevents hot spots and keeps the emulsion smooth. If you walk away from the stove, the curd might break before you see the warning signs.
Stay with it. A properly cooked curd pours like thick cream. It doesn't plop.
It doesn't run like water. The gloss tells you it's stable.
Meringue Peaks Decoded: Soft, Firm, Stiff, and How They Should Look in Color
Meringue comes in three distinct stages. Each stage has a clear visual test. Using the right stage for your recipe makes the difference between a stable topping and a weeping mess.
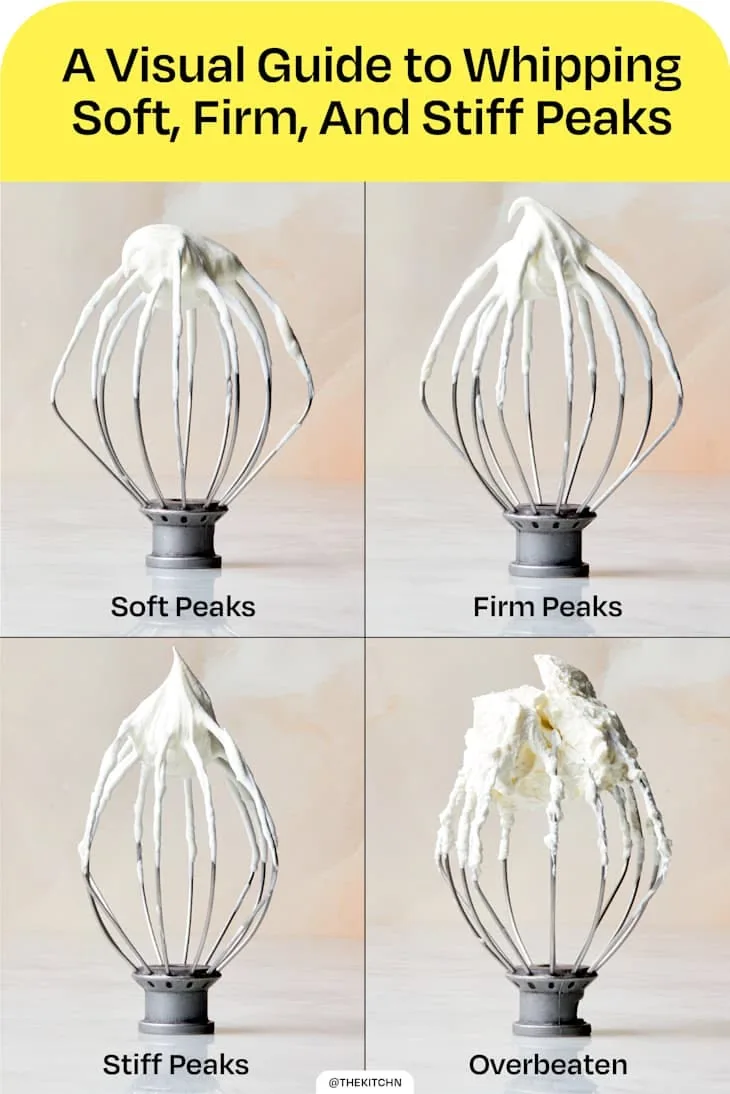
Image source: Bing (Web (fair-use with source credit))
The Flop Test for Soft Peaks
Soft peaks form after about three minutes of whipping at medium-high speed. Lift the whisk straight up. The meringue should form a peak that flops over immediately.
The tip curls back on itself.
Use soft peaks for souffles and some meringue toppings that need to spread. The texture is loose and airy. It doesn't hold sharp shapes.
Soft peaks also work well for folding into cake batters.
The Hook Test for Firm Peaks
Firm peaks take about five minutes. Lift the whisk. The peak stands up but curves at the tip into a small hook.
The meringue holds its shape without drooping.
This is the most versatile stage. Use firm peaks for most lemon meringue pie recipes. The meringue spreads nicely over the filling.
It browns evenly in the oven. You can pipe it into decorative shapes that hold during baking.
The Sharp-Tip Test for Stiff Peaks
Stiff peaks take about seven minutes. Lift the whisk. The peak stands straight up with a sharp point that doesn't bend.
The meringue looks glossy and smooth.
Use stiff peaks for pavlova and baked meringue shells. This stage gives you the most structure. Be careful not to overwhip.
Stiff peaks that go too far turn grainy and start to separate. You'll see the meringue look dry and curdled.
Color Tells You More
White sugar produces white meringue. But the texture matters more than the color. A dull, grainy meringue means the sugar hasn't dissolved properly.
Rub a small amount between your fingers. If it feels gritty, keep whipping.
A glossy, smooth meringue means the sugar is fully incorporated. The surface reflects light evenly. This is your visual confirmation that the mixture is stable.
Lemon Bars and Tarts: How to Read the Set, Crust, and Gloss
Lemon bars and tarts follow similar visual rules. The filling needs to set without overcooking. The crust needs to be fully baked without burning.
Both require watching, not just timing.
How to See the Doneness Window in Lemon Bars
Lemon bars are done when the center jiggles slightly. Not like liquid. Not firm like gelatin.
A gentle wobble across the whole pan. The edges should be set and slightly puffed.
Lemon bars typically bake at 350°F for 20 to 25 minutes. Start checking at 18 minutes. Shake the pan gently.
Look for that unified jiggle. If the center sloshes like liquid, bake another three minutes. If the center doesn't move at all, you've overbaked.
The Slightly-Jiggy Center Test for Tarts
Tarts follow the same principle. The filling should jiggle like set gelatin. Not sloshy.
Not stiff. A slow, unified wobble from edge to center.
Overbaking the filling causes cracks on the surface. Small cracks are okay. Large cracks mean the filling is dry and rubbery.
Underbaking leaves the filling too soft to slice cleanly. The tart should hold its shape after it cools completely.
Visual Clues That the Crust Is Done Without Burning
The crust tells you when to pull the whole dessert. Look for the edges pulling away from the pan slightly. The bottom should be golden, not pale.
The sides should be set and firm.
One trick for even browning. Rotate the pan halfway through baking. Ovens have hot spots.
A rotated pan bakes more evenly and gives you a consistent color across the whole crust. If the top edges darken before the center is done, cover them loosely with foil.
The 7 Common Visual Mistakes in Lemon Desserts (and How to Spot Them Early)
Most lemon recipe failures share the same visual warning signs. Learn these and you'll catch problems before they ruin your dessert.
Weeping Meringue: Why It Sweats and What It Looks Like
Weeping meringue has small beads of liquid on the surface. It looks like the meringue is sweating. This happens when the meringue is undercooked or the sugar hasn't fully dissolved.
The fix is simple. Make sure the sugar dissolves completely during whipping. Test by rubbing a bit between your fingers.
No grit means it's ready. Bake the meringue at a high enough temperature to set it quickly.
Grainy Curd: Recognizing a Broken Emulsion
Grainy curd looks curdled and separated. Instead of a smooth, glossy texture, you see small lumps. The surface looks dull and matte.
Low heat and constant whisking prevent this. Cook the curd over medium-low heat. Whisk steadily but gently.
If you see the first signs of graininess, pull the pan off the heat immediately and whisk hard to bring the emulsion back together.
Soggy Crust: The Color Trick to Avoid Picnic Pie
A soggy crust looks wet and dark on the bottom. It lacks the dry, flaky texture of a properly baked shell. The trick is to blind bake until the crust is golden all over.
Blind bake at 375°F for 15 minutes with pie weights. Remove the weights. Bake another 5 to 7 minutes.
The bottom should look dry and light golden. If the bottom looks pale or translucent, it will absorb moisture from the filling.
Four More Visual Mistakes to Catch Early
Cracked tart tops happen when the filling bakes too fast or too hot. Lower the oven temperature by 25°F. Bake longer but gentler.
Dull curd means the butter didn't emulsify fully. Whisk in a small pat of cold butter off the heat. It should bring the gloss back.
Uneven color on the crust means the oven has hot spots. Rotate the pan regularly.
Overcooked edges on lemon bars turn dark and tough. Trim them off before serving. Next time, pull the pan five minutes earlier and trust the visual test.
Here are the next 2 H2 sections, continuing directly from where the previous batch ended.
Lemon Desserts at a Glance: A Visual Cheat-Sheet for Curd, Meringues, and Bars
This table sums up the key visual markers for each dessert type. Keep it handy while you cook.
| Dessert | Done When You See This | Stop Immediately If | Test Method |
|---|---|---|---|
| Lemon Curd | Glossy surface, coats spoon back, finger line holds | Surface looks dull or grainy | Spoon test at 170°F to 180°F |
| Meringue (Soft Peaks) | Peak flops over, tip curls | Looks dry or separates from bowl sides | Lift whisk straight up |
| Meringue (Firm Peaks) | Peak stands with hooked tip | Starts looking grainy or shiny spots appear | Lift whisk, check tip curve |
| Meringue (Stiff Peaks) | Peak stands straight, sharp point | Becomes dry and clumpy | Lift whisk, check point |
| Lemon Bars | Center jiggles as one unit, edges set | Center sloshes like liquid or is completely firm | Shake pan gently |
| Lemon Tarts | Filling wobbles like set gelatin, no cracks | Large cracks form on surface | Shake pan gently |
| Pie Crust | Golden bottom, edges pull from pan | Bottom looks pale or translucent | Lift edge with spatula |
Use this table as a quick reference. Each row gives you the exact visual target to aim for.
Quick Temperature Reference
Curd hits the sweet spot between 170°F and 180°F. Below that, it's too thin. Above that, you risk curdling.
Meringue doesn't need a thermometer. Look for the peak tests instead. Lemon bars and tarts bake at 350°F.
Start checking at 18 minutes for bars and 25 minutes for tarts.
One Final Visual Rule
Trust your eyes over the timer. A recipe that says "bake for 30 minutes" assumes your oven runs perfectly. It doesn't.
Start checking five minutes early. The visual cues never lie. The clock often does.
Frequently Asked Questions
Why does my lemon curd taste like scrambled eggs?
You cooked it too hot or too fast. The egg proteins tightened up and separated from the liquid. Cook over medium-low heat.
Whisk constantly. Keep the temperature under 180°F. If it curdles, blend it smooth with an immersion blender.
How do I fix meringue that won't form peaks?
Your bowl or whisk had traces of grease or fat. Even a speck of egg yolk ruins the foam. Start over.
Clean everything with vinegar or lemon juice. Wipe dry with a paper towel. Separate eggs carefully.
No yolk allowed.
Can I freeze lemon curd?
Yes. Lemon curd freezes well for up to three months. Let it cool completely.
Transfer to an airtight container. Leave a little headroom for expansion. Thaw overnight in the fridge.
Whisk gently before using.
Why do my lemon bars stick to the pan?
You didn't line the pan properly. Use parchment paper with overhang on two sides. The overhang acts as handles to lift the bars out after cooling.
Cut the bars only after they set completely at room temperature.
How do I get a taller meringue on my pie?
Use room temperature egg whites. Add cream of tartar early in the whipping process. One teaspoon per four egg whites stabilizes the foam.
Whip to stiff peaks. Spread the meringue over hot filling. The heat helps set the bottom layer.
What's the difference between Meyer and Eureka lemons in recipes?
Meyer lemons are sweeter and less acidic. They work well for desserts where you want a milder flavor. Eureka lemons are tarter and more acidic.
They give a brighter, sharper taste. Swap one for the other by adjusting sugar by about two tablespoons per cup of juice.

Similar Posts