How to Sharpen Knives with a Whetstone: Step-by-Step Guide
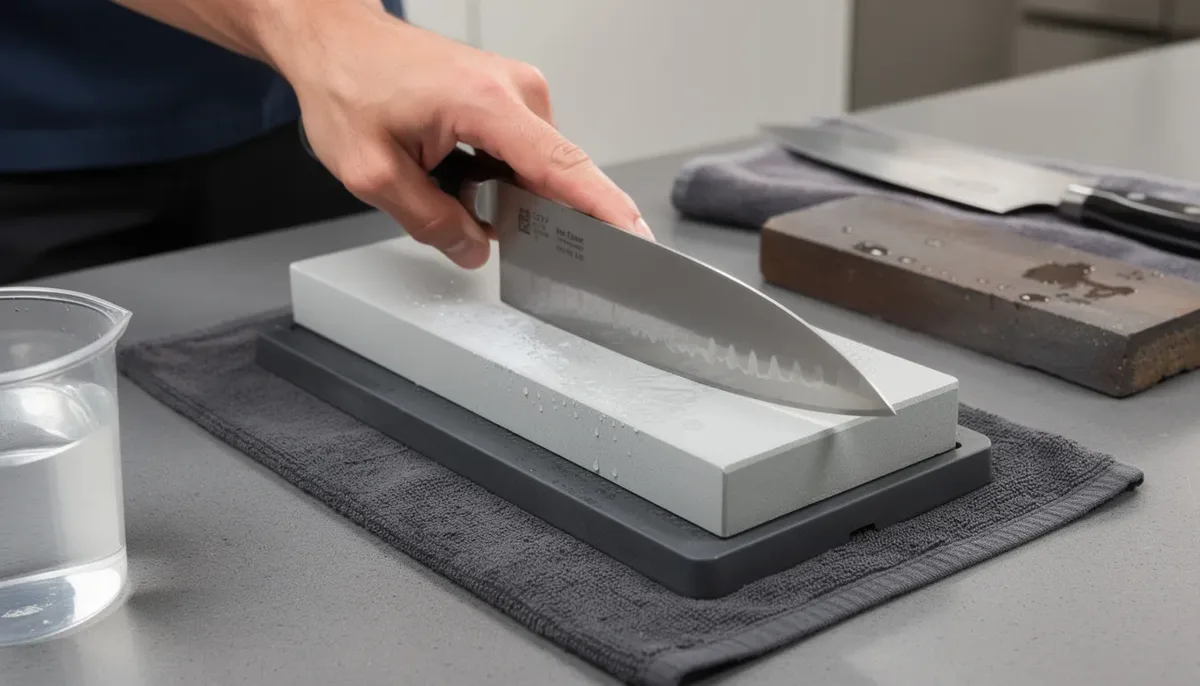
If you have ever watched a chef glide a knife through a tomato like it was butter and wondered how to sharpen knives with a stone, you are in the right place. The secret is not a magic stone or a fancy brand. It is understanding the angle, the pressure, and the burr.
Most knife sharpeners cost anywhere from $20 to $80, while professional chef's knives run 58, 62 on the Rockwell hardness scale. That matters because harder steel holds an edge longer but takes more patience to sharpen. This guide walks you through every step, with the visual cues that separate people who sharpen from people who just scrape metal.
The First 10 Minutes: Why Most People Fail (and How You Won't)
The biggest reason people give up on whetstones is that they start wrong. They push too hard, hold the knife at random angles, and stop before the burr ever forms. Then they blame the stone.
In our research, the failure almost always comes down to three mistakes: inconsistent angle, skipping the burr, and using too much force. Fix those, and the rest of the process falls into place. It is not about natural talent.
It is about learning what to look for and what to feel.
Image source: Bing (Web (fair-use with source credit))
You do not need a lot of gear to start. A dual-grit whetstone around 1000 and 4000 grit, a flat surface, a damp cloth, and your knife. That is the minimum.
As of 2026, most quality combo stones sell for between $30 and $60, which is cheaper than a single professional sharpening service.
Plan for your first session to take 20 to 30 minutes. That is normal. If you finish and the knife does not slice paper cleanly, do not assume the stone is bad.
Ninety percent of the time, the technique needs adjusting, not the equipment.
Soaking and Prepping Your Stone: The Setup That Makes Everything Easier
Before you drag a blade across anything, the stone has to be ready. The two main types of stones are water stones and oil stones. Water stones soak in water before use.
Oil stones use mineral oil as a lubricant. Most modern sharpening is done with water stones because they cut faster and leave a cleaner edge.
| Stone Type | Soak Time | Best For |
|---|---|---|
| Water stone | 10 to 15 minutes | Most kitchen and pocket knives |
| Oil stone | No soak | Field sharpening, vintage tools |
| Diamond stone | No soak | Quick maintenance, hard steel |
If you are using a water stone, submerge it fully in water for 10 to 15 minutes. Do not skip this. A dry water stone will not release the correct cutting particles, and you will just polish the edge instead of sharpening it.
Meanwhile, place a damp cloth or paper towel underneath the stone. That keeps it from sliding across the counter.
Check the stone surface before you start. Is it perfectly flat? Run a straight edge across it.
If you see light under the middle, the stone is "dished," meaning the center is worn down. A dished stone ruins your angle because the edge curves as it passes. Fix it with a flattening stone or a coarse diamond plate.
A properly prepped stone should sit rock solid, feel slightly textured under a wet fingertip, and have no wobble. When you set the knife on it, you want to feel the stone "bite" into the steel. That tactile feedback is your sign that the surface is open and cutting.
Finding the Angle: The One Skill That Changes Everything
You have probably heard "hold it at 20 degrees." But what does that actually look like in your hand? It is roughly the angle of a stack of two or three coins lying flat. That is the visual reference that finally made it click for many beginners.
Place the knife's edge flat on the stone, then tilt the spine up until you feel the cutting edge meet the stone. That tilt, that just-barely-there angle, is your starting point. For most kitchen knives, a 15 to 20 degree angle per side works best.
Softer steel takes a wider angle, closer to 20. Harder, high-carbon steel takes a narrower one, around 15.
Here is the part most guides skip: once you find the angle, you have to hold it on every pass. That is the hard part. It is not about your strength.
It is about your consistency. If the angle shifts even a few degrees mid-stroke, you are rounding the edge instead of sharpening it.
A good trick is to raise the heel of your dominant hand slightly, as if you were petting a cat. Keep your wrist locked and move from your shoulder and elbow. Visualize the knife riding along the stone like a train on tracks.
The whole bevel, not just the very edge, should stay in contact with the stone.
One question beginners ask is whether they should push the blade away or pull it toward themselves. The answer is: both, depending on direction. Sharpen with the edge moving forward away from your body, then flip the knife and pull back toward you.
What matters is that the edge, not the spine, leads the motion.
The Three-Pass Workout: Building the Burr Like a Pro
Now the actual sharpening begins. Do not think of this as grinding away a lot of metal. Think of it as building a new edge.
That happens in three distinct phases, each with a different grit and a different goal.
Pass 1: Coarse Grit (Establish the Burr)
Start on the coarse side, around 400 to 1000 grit. This step removes the dull, rounded metal and creates a fresh, clean bevel. Apply moderate pressure.
Not heavy pressure, just enough that the stone bites. Slide the knife from heel to tip in a smooth, sweeping stroke. Ten strokes per side is a good starting point.
As you work, you should feel a slight roughness forming along the opposite edge of the blade. That roughness is the burr, a tiny curl of metal that tells you the bevel is fully sharpened on that side. If you feel nothing after ten strokes, add a few more.
If you still feel nothing, check that you are maintaining the angle.
| Grit Range | Purpose | Pressure |
|---|---|---|
| 400–1000 | Establish the burr | Medium to firm |
| 2000–3000 | Refine the edge | Light |
| 4000–8000 | Polish and align | Very light |
Pass 2: Medium Grit (Refine the Edge)
Once the burr is consistent along the entire edge, flip the stone to the medium side. This step smooths out the scratches left by the coarse grit and makes the edge more durable. Use lighter pressure now, probably half of what you used in Pass 1.
Repeat the same smooth strokes, ten per side. As you go, the burr will start to feel smaller. That is good.
It means the edge is becoming cleaner and more aligned. You are not removing as much metal here, so do not press hard. Let the stone do the work.
Pass 3: Fine Grit (Polish and Align)
If you have a fine stone at 4000 to 8000 grit, this is the final step. It does not sharpen the blade so much as polish it. A polished edge slices more smoothly and stays sharp longer.
Use very light pressure, barely more than the weight of the knife itself.
Five strokes per side is plenty. What you are aiming for is a clean, even edge that reflects light uniformly. When you look at the blade edge under a bright light, you should not see any shiny spots, which are rolled or dull areas.
The whole edge should look like one continuous line. That is visually the most satisfying moment in sharpening.
If you consistently maintain the same angle and pressure, you will feel a distinct difference by the end. The edge will grab at your fingertip when you barely graze it. That is not a sharpening test at this point.
It is a side effect of doing the work correctly.
What the Burr Really Looks and Feels Like (The "Aha" Moment)
The single biggest "aha" in sharpening is understanding the burr. Without it, you are just dragging steel across rock. With it, everything clicks.
The burr is the evidence that your edge is actually apexed all the way out to the tip.
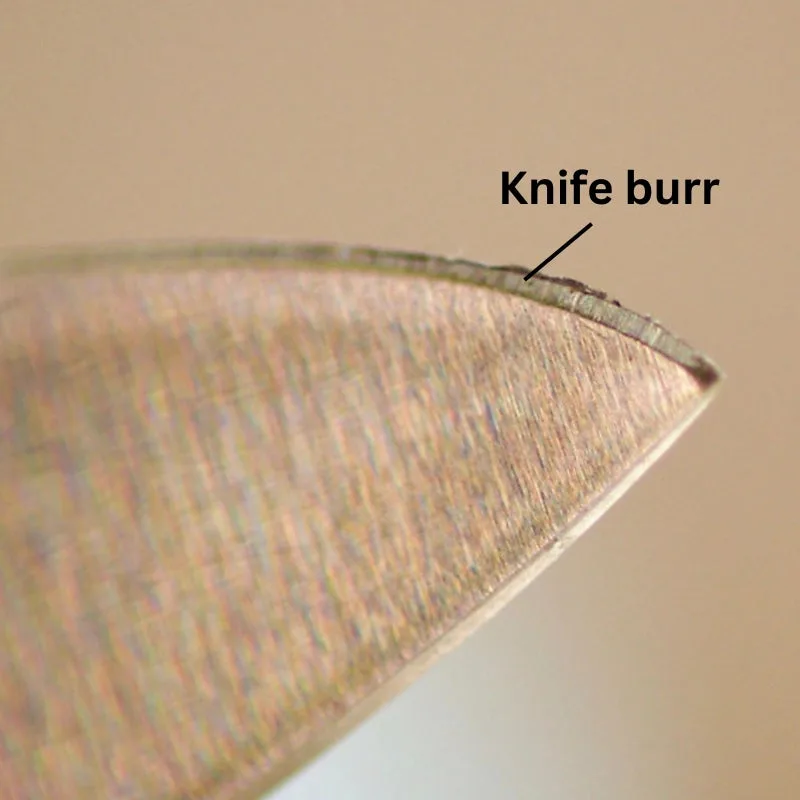
Image source: Bing (Web (fair-use with source credit))
So what does it feel like? Take your thumb and slide it off the side of the blade, perpendicular to the edge, from the spine toward the cutting side. Do not slide your finger along the edge itself.
That is a fast way to get cut. The burr will catch your thumb like tiny, invisible teeth. It feels rough, scratchy, and slightly hooked.
Visually, the burr shows up as a thin, wire-like line of metal along the edge. It is more visible on softer steel. On harder steel, you may only feel it.
Either way, a uniform burr along the full length of the blade tells you the angle is consistent and the edge is fully formed.
If you skip the burr, you are sharpening without a target. The edge never reaches its true apex, and the knife will feel sharp for a day, then dull again. The burr is not a flaw.
It is proof. The moment you feel that scratchy ridge, you know the coarse-grit work is done and you can move on.
Once you feel the burr on both sides, you need to remove it. Otherwise, that thin wire of metal folds over and creates a weak, temporary edge. A few light, alternating strokes on the fine stone or a quick pass across a leather strop will clean it off.
University extension programs on knife care often emphasize this final de-burring step, and they are right. It is the difference between an edge that lasts a week and one that lasts a month.
Removing the burr without ruining your edge:
- Use the finest grit you have.
- Alternate sides with every single stroke.
- Use almost no pressure.
- Finish with a strop if you have one.
After the burr is gone, the test is simple. Try slicing a piece of paper. If the knife catches and cuts cleanly without tearing, you nailed it.
If it drags, go back to the medium grit and repeat the last few strokes. That is the whole loop. Angle, burr, refine, de-burr.
Once you feel the burr, you are no longer sharpening blind.

Similar Posts