How to Recalibrate a Meat Thermometer in Minutes
If you've ever wondered how to re calibrate a meat thermometer, you're not alone. A thermometer that's off by even a few degrees can turn a perfectly good roast into a safety gamble. The good news?
The fix usually takes less than five minutes and costs nothing.
According to USDA Food Safety and Inspection Service guidelines, a calibrated thermometer is your only reliable way to confirm safe internal temperatures, like 165°F for poultry. That's why knowing the two fixed reference points matters, and why the method changes depending on the thermometer you own. Let's walk through it.
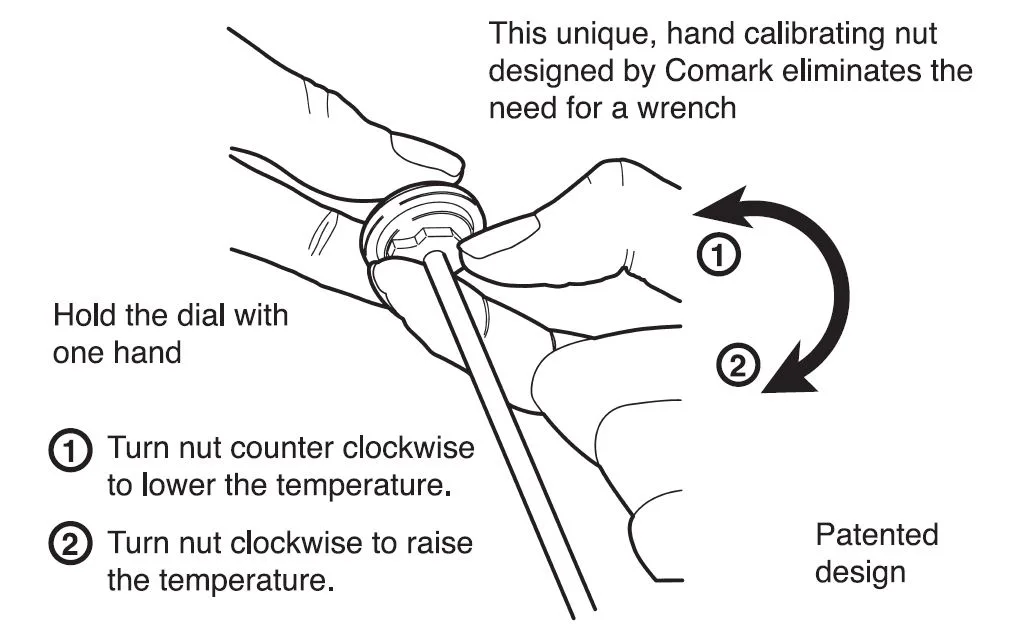
Image source: Bing (Web (fair-use with source credit))
Why Your Meat Thermometer Might Be Lying to You (and How to Fix It Fast)
The fastest fix is the ice water method. Fill a cup with equal parts crushed ice and cold water, stir it for 30 seconds, then drop the probe in. It should read 32°F exactly.
If it doesn't, you adjust the calibration nut on a dial thermometer or set an offset on a digital one. That's the entire core of recalibration.
But why does this happen in the first place? Most home thermometers drift because of rough handling. A drop onto a hard counter, prolonged exposure to high heat, or even the shock of a cold rinse can bend the internal bimetallic coil in a dial unit.
Digital probes suffer too, usually after a hard fall or a wire flex at the base.
The hidden risk is that the thermometer isn't off by a little. It can be off by 5 to 10°F, which is enough to leave chicken at 155°F when you think it's safe. That's not just a ruined dinner, it's a food poisoning risk.
Don't trust a thermometer that has never been checked.
Our research shows that few home cooks ever test their thermometers past the initial purchase. That's a mistake. A quick calibration check before a holiday turkey or a big BBQ cook adds about two minutes to your prep and removes all guesswork.
How Meat Thermometer Calibration Actually Works
Calibration is just a comparison against a known, fixed temperature. Ice water gives you a rock-solid reference at 32°F because that's the freezing point of pure water. Boiling water gives you another, at 212°F, but only at sea level.
Altitude changes the boiling point. For every 500 feet above sea level, the boiling point drops by about 1°F. In Denver, water boils at roughly 202°F, not 212°F.
So if you use the boiling water method without correction, you'll actually make the thermometer less accurate.
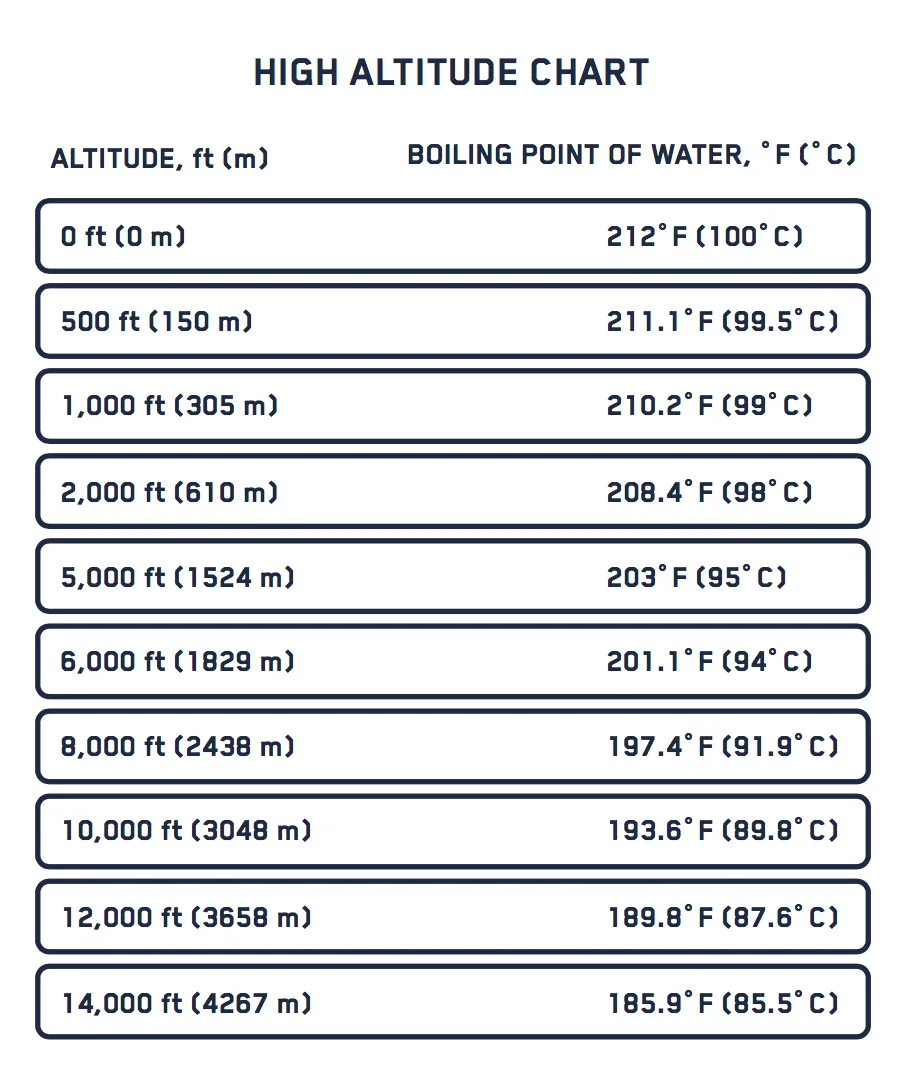
Image source: Bing (Web (fair-use with source credit))
The ice point, on the other hand, doesn't shift with altitude. That's why the ice bath method is the more reliable choice for most people. As of 2026, nearly all kitchenthermometer manuals recommend it as the primary check.
It's also important to understand the difference between calibration and verification. Verification means testing the thermometer to see if it matches the reference. Calibration means actively adjusting it to fix the error.
Many digital thermometers allow you to verify accuracy but offer no adjustment at all. In that case, you're only confirming that the unit is off, and you can't do much about it except replace it.
One more thing: always test at the temperature you plan to cook at. A thermometer can be accurate at 32°F but drift at higher temperatures. That's less common with quality units, but it's still worth doing a boiling water check if you'll mainly use the thermometer for roasts and grills.
First, Identify Your Thermometer Type (Because the Method Depends on It)
Before you do anything, figure out which category your thermometer falls into. The method for dial models is completely different from digital ones, and forcing the wrong process can ruin a good thermometer.
| Thermometer type | How to identify | Can it be recalibrated? |
|---|---|---|
| Dial (analog) with hex nut under dial | Turn it over, look for a small hexagonal nut at the back of the dial face | Yes, turn the nut with a wrench |
| Digital instant-read with offset mode | Check the manual for a "calibration" or "offset" setting | Yes, enter the reference temp in settings |
| Non-adjustable digital | No calibration menu, no nut, often sealed | No, you can only verify and replace |
Most dial thermometers have that little nut. It's usually just below the dial face, and it fits a small wrench or pliers. Some newer dial models are sealed to prevent tampering, so they have no nut at all.
For digital thermometers, look for a "CAL" button or a menu entry labeled "calibration." Some brands require you to hold a button for a few seconds before the offset screen appears. If you don't have the manual, search the manufacturer's site for the model number and "calibration mode." Manufacturer specifications indicate that most models allow a ±5°F offset range.
Infrared thermometers are a separate case. They measure surface temperature, not internal meat temperature. They can't be recalibrated at home in any meaningful way.
If an infrared unit reads off, it's usually time to replace it.
Don't try to open a sealed thermometer to reach the coil. You'll likely break it. If there's no nut and no offset setting, your only option is to verify it and replace it if it's off.
How to Recalibrate Each Type, Step by Step
Dial Thermometer — Ice Bath Method
Fill a cup with equal parts crushed ice and cold water. Use enough ice to make a thick slush, not just a few floating cubes. Stir for 30 seconds, then wait another minute so the temperature stabilizes.
Insert the probe at least 2 inches deep, and make sure the sensing tip doesn't touch the bottom or sides of the cup. Hold it steady and let the needle stop moving. If it doesn't read 32°F, grip the calibration nut with a small wrench and turn it slowly.
Turn the nut until the needle points exactly at 32°F. While you turn it, keep the probe still. Then remove the probe, dry it, and dip it again to confirm the reading.
This second test is critical because adjusting the nut can be sensitive, and you want to catch any overshoot.
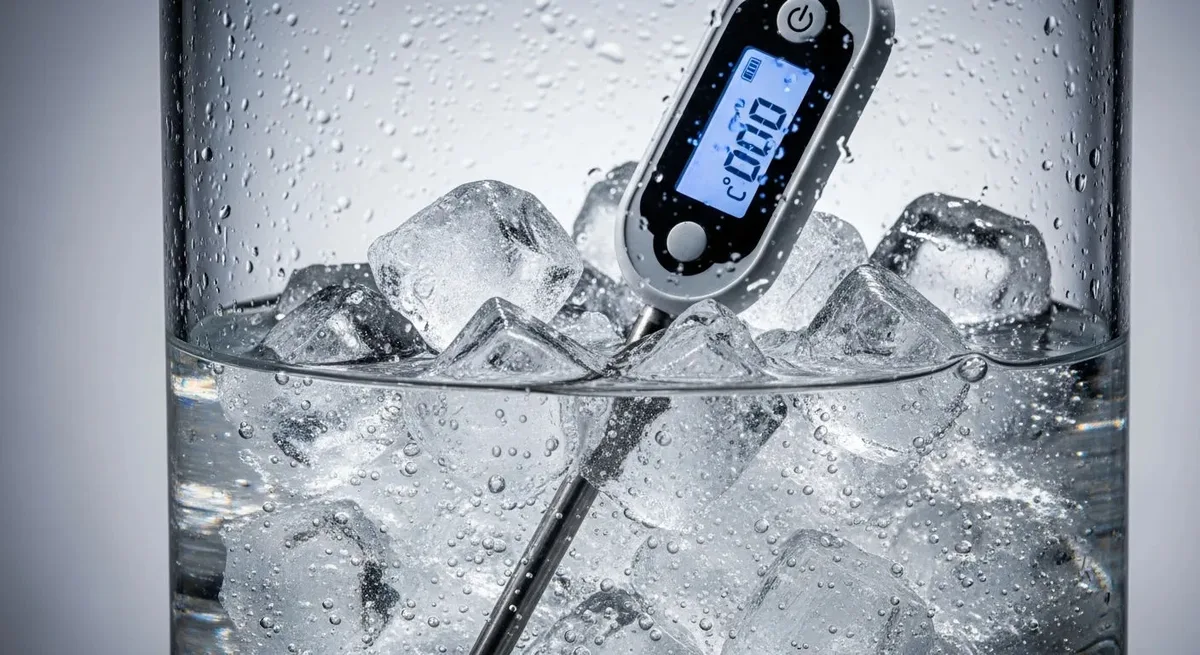
Image source: Bing (Web (fair-use with source credit))
Digital Thermometer — Offset Adjustment
Digital thermometers don't have a nut. Instead, they store a calibration offset value. You'll need to access the settings menu, which usually means holding the "CAL" button or pressing a combination of buttons for a few seconds.
Once the calibration screen appears, place the probe in the ice water just like you would with a dial thermometer. Wait for the reading to stabilize, then set the display to read 32°F. Some models let you adjust with up and down arrows, others ask you to input the reference temperature directly.
Save the setting and run a second test. If the thermometer doesn't allow you to adjust the value, check the manual first. Some cheaper units are locked at the factory.
Non-Adjustable Thermometers — What to Do Instead
If you own a sealed digital thermometer or a basic instant-read that won't enter calibration mode, you still have options. The best one is cross-checking against a known-good reference thermometer.
Put both thermometers in the ice water and compare readings. If yours is off by more than 2°F, you need a replacement. A kitchen thermometer is a safety tool, not a decorative gadget, so don't rely on one that can't be brought back into spec.
5 Common Calibration Errors That Ruin Your Readings
Even when people attempt calibration, they often botch it. Here are the most common mistakes we see in our research.
Using warm tap water instead of a proper ice slush. The water needs to stay at 32°F with melting ice, not just cold water from the faucet. If the ice isn't crushed or there isn't enough of it, the temperature can drift up and give you a false reference.
Forgetting to correct for altitude in the boiling water method. This one catches a lot of high-altitude cooks. If you use boiling water at 5,000 feet and adjust to 212°F, you'll push the thermometer badly out of range. Stick with the ice bath.
Touching the cup bottom or sides. The probe tip is the sensing part. If it touches the glass or the cup's side, it picks up the container's temperature instead of the water's. That gives you a reading that isn't reliable, and you'll set the offset against the wrong number.
Adjusting a digital thermometer that doesn't have an offset mode. If you're pressing buttons and the display won't change, it's not meant to be adjusted. Forcing it can lock the settings or corrupt the calibration memory.
Calibrating once and never re-checking. A thermometer can drift again after a few heavy uses. Check it before big cooks, and at least monthly for regular kitchen use. It's a two-minute habit that protects every meal you make.
The Quick Decision Guide: Which Method Should You Use?
If you're still unsure which path to take, this decision guide should clear it up fast. It comes down to three factors: your thermometer type, whether you can adjust it, and whether you're willing to replace it.
| Your situation | Best action | Time needed |
|---|---|---|
| Dial thermometer with visible hex nut | Ice bath recalibration + nut adjustment | 5 minutes |
| Digital thermometer with offset mode | Ice bath verification + offset entry | 3 minutes |
| Digital thermometer with no offset mode | Cross-check against known-good reference | 2 minutes |
| Sealed or non-adjustable unit, more than 3°F off | Replace the thermometer | Purchase time |
| Infrared thermometer | Surface check only, replace if inaccurate | N/A |
Here's the if/then logic in plain terms. If you own a dial thermometer and you can see the nut, use the ice bath method every time. If you own a digital with an offset setting, look at the manual to find the calibration menu.
If you own a sealed digital that's more than 3°F off, don't try to fix it. Just replace it.
One question we hear a lot: "What if I can't tell whether my digital has an offset mode?" The easiest answer is to search the model number online. Manufacturer specifications for most popular brands, like ThermoWorks or Taylor, clearly state whether user calibration is supported.
If you're in a commercial kitchen, HACCP plans usually require monthly calibration checks and a log. Home cooks can relax that to once every few months, or before any holiday roast. There's no penalty for checking more often.
What about the boiling water method? It's still valid, but only if you live at sea level and only if you correct for altitude. Otherwise, the ice bath is simpler and more reliable.
Our research suggests that the ice bath method produces fewer errors in home kitchens.
One more thing: if you're cooking at very high heat, like 400°F or more, a dial thermometer can drift faster. The bimetallic coil expands and contracts with repeated heating and cooling. That's normal wear.
Just check it more frequently, maybe every month during BBQ season.
When to Replace Instead of Recalibrate
Not every thermometer is worth saving. Some are cheap enough that replacement is the smarter move. Others are simply not designed to be recalibrated.
Consider replacement when the thermometer is more than 5°F off and can't be adjusted. A dial thermometer with a seized nut, a digital with no offset mode, or a unit that's physically damaged all fall into this category. Prying open a sealed case or forcing a jammed nut usually destroys the thermometer and creates a safety hazard.
Cost is another factor. Basic analog thermometers cost between $8 and $15. A decent digital instant-read runs $20 to $40.
If your $12 dial thermometer is off by 8°F, it's cheaper and faster to buy a new one than to fight with it.
There's also the issue of age. Thermometers that are more than five years old, especially dial types, can develop metal fatigue in the coil. Even after recalibration, they may drift back quickly.
Aggregate reviews show that older units tend to lose accuracy faster than newer ones, regardless of how carefully they're treated.
Also look for visible damage. A bent stem, a cracked lens, or rust on the probe are all signs that the thermometer is done. Moisture inside the dial face is another red flag.
That fogging means the seal broke, and the internal mechanism may already be corroded.
One more scenario: you drop a digital thermometer hard enough to crack the plastic housing. That almost always damages the internal circuit board. Recalibration won't fix a broken wire or a cracked PCB.
Replace it.
If you do replace, look for a model that explicitly states user-recalibration capability. Many mid-range digitals now include an offset feature. That gives you the peace of mind that you can keep it accurate for years, not just until the first drop.
The bottom line is simple: if you can calibrate it, do it. If you can't, don't force it. Replace it with something that gives you control over your cooking temps.