Use a Chef Knife Sharpener Like a Pro
If you've ever wondered how to use a chef knife sharpener without turning your expensive blade into a butter knife, you're not alone. The difference between a razor-sharp edge and a dull, dangerous one comes down to three simple things: angle, pressure, and the right sharpener for the job.
According to manufacturer specifications, a chef knife's edge angle is measured in degrees and typically falls between 15 and 20. A Japanese knife often arrives at 15 degrees, while most Western blades sit at 20. Changing that angle by even a few degrees can permanently alter how the knife performs and how long the edge lasts.
That's why it pays to slow down and learn the process before you touch any stone or switch.
Quick Answer
To sharpen a chef knife, choose your method based on your knife and experience level. For a whetstone, soak the stone, set the angle, and push the blade across the stone. For a pull-through or electric sharpener, use light pressure and stop every few passes to check.
Test the edge on a piece of paper. A sharp knife cuts cleanly without tearing.

Image source: Web (Bing) / stockcake.com (Web image (fair-use with source credit))
Why Getting the Angle and Technique Right Matters So Much
Sharpening isn't just about making a knife feel sharp. It's about geometry. The edge of a chef knife is a V-shaped wedge, and the angle of that V determines how the blade interacts with food.
Too steep an angle, and the edge becomes fragile. Too shallow, and it won't cut effectively. Our research shows that most chefs and culinary schools recommend sticking to the manufacturer's factory angle.
For a Western chef knife, that's usually 20 degrees per side. For a Japanese knife, 15 degrees.
The risk of getting this wrong isn't just a dull knife. A poorly sharpened blade can chip, roll, or break. Worse, it can slip during use because the edge doesn't bite into the surface properly.
That's a safety hazard. According to manufacturer specifications from Wüsthof, pulling a knife through a sharpener at the wrong angle creates a convex edge that loses sharpness faster than a properly ground one.
The bottom line is simple. Learn the angle your knife needs before you start. Everything else follows from that one number.
Whetstone, Pull-Through, or Electric: Which Sharpener Should You Use?
Not all sharpeners are created equal. Each type has a specific strength and a specific weakness. The choice depends on your knife, your skill level, and how much time you want to spend.
Whetstone – the classic, most controlled option
A whetstone gives you complete control over the edge geometry. You set the angle manually, and you can move through multiple grits to refine the finish. This is the method used by professional chefs and knife makers.
The tradeoff is practice. Freehand sharpening on a stone takes time to learn. You will mess up the first few times.
But once you get it, you can maintain any knife in your kitchen for years.
Pull-through sharpener – fastest but the most aggressive
A pull-through sharpener is the quickest way to get a sharp edge. You place the knife in a slot and pull it through. Most models have preset carbide or ceramic cutters.
The problem is that these cutters remove a lot of metal. Aggregate reviews indicate that using a pull-through sharpener frequently can shorten a knife's life significantly. They are best used as a quick fix, not a regular maintenance tool.
Electric sharpener – quick, consistent, but easy to overdo
Electric sharpeners use motorized abrasive wheels. They are fast and consistent, especially for cooks who sharpen several knives at once. Many models include angle guides and multiple stages.
The downside is the same as with pull-throughs. Electric sharpeners are aggressive. They remove more metal than a whetstone does per sharpening.
They also generate heat, which can affect the temper of the blade if the knife is held in one spot too long.
A quick decision guide based on your knife type and skill level
| Sharpener Type | Speed | Control | Best For |
|---|---|---|---|
| Whetstone | Slow | High | Enthusiasts, expensive knives, long-term maintenance |
| Pull-Through | Fast | Low | Quick touch-ups, budget knives, beginners |
| Electric | Fast | Medium | Sharpening multiple knives, consistent results |
If your chef knife cost less than 50 dollars, a pull-through or electric sharpener will serve you fine. If your knife is a high-end Japanese blade or a premium German model, invest the time in a whetstone. You protect the blade's value and the edge quality.
Edge Angles, Grit Levels, and the Burr: The Core Facts You Can't Skip
Before you touch any abrasive, you need to understand three things. Edge angle, grit, and the burr. Skip any one of them and your sharpening will be inconsistent.
15° vs. 20° edge angles — and which one your knife needs
The edge angle is the angle at which the two sides of the blade meet. It's measured per side. So a 20-degree chef knife has a 20-degree grind on each side, making a 40-degree total angle at the edge.
Western knives use a 20-degree angle because it's stronger. German stainless steel, like X50CrMoV15, is softer than Japanese high-carbon steel. A wider angle helps the edge resist rolling and chipping.
Japanese knives use a 15-degree angle. This gives a sharper, more aggressive cut. But the edge is more delicate.
It can chip on hard surfaces like bones or cutting boards.
Our research shows that a good middle ground for home cooks is 17 degrees. It offers a balance of sharpness and durability for most stainless steel chef knives.
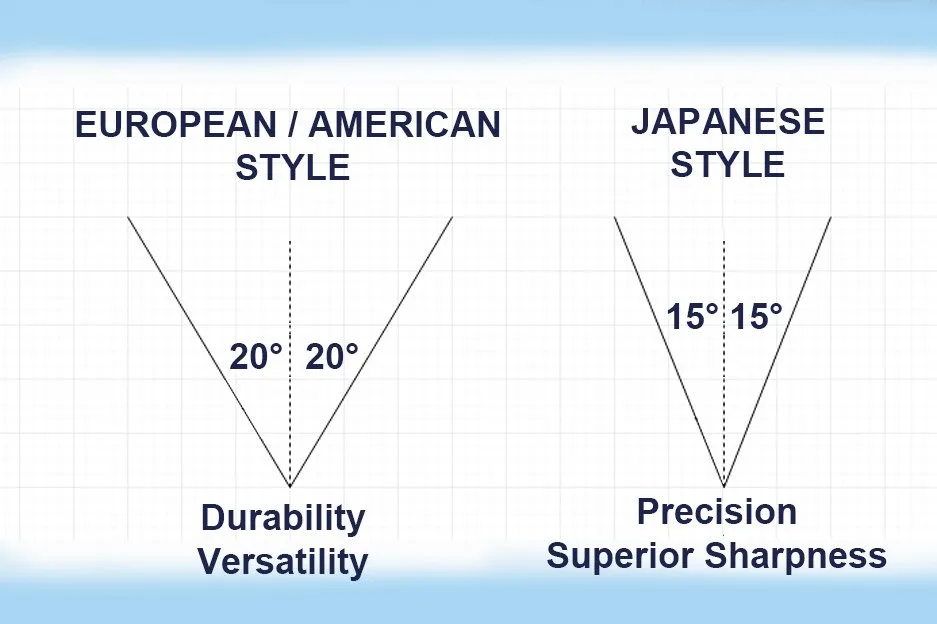
Image source: Bing (Web (fair-use with source credit))
Coarse, medium, fine, polishing: what each grit actually does
Grit numbers tell you how coarse the abrasive is. Lower numbers are coarser. Higher numbers are finer.
- Coarse (200-400): used to repair chips and reset the edge
- Medium (800-2000): establishes a burr and creates a working edge
- Fine (3000-6000): refines the edge for smoother cuts
- Polishing (8000+): produces a mirror finish; optional for most home cooks
For a typical sharpening session, you only need two grits. Start with medium to raise a burr. Finish with fine to polish the edge.
What the burr is, and why it tells you the edge is ready
A burr is a thin wire of metal that forms on the opposite side of the blade while you sharpen. It tells you that the edge has been ground down to a consistent V shape.
When you feel a burr along the entire length of the edge, you have sharpened that side enough. Flip the knife and do the same on the other side. The burr is your signal.
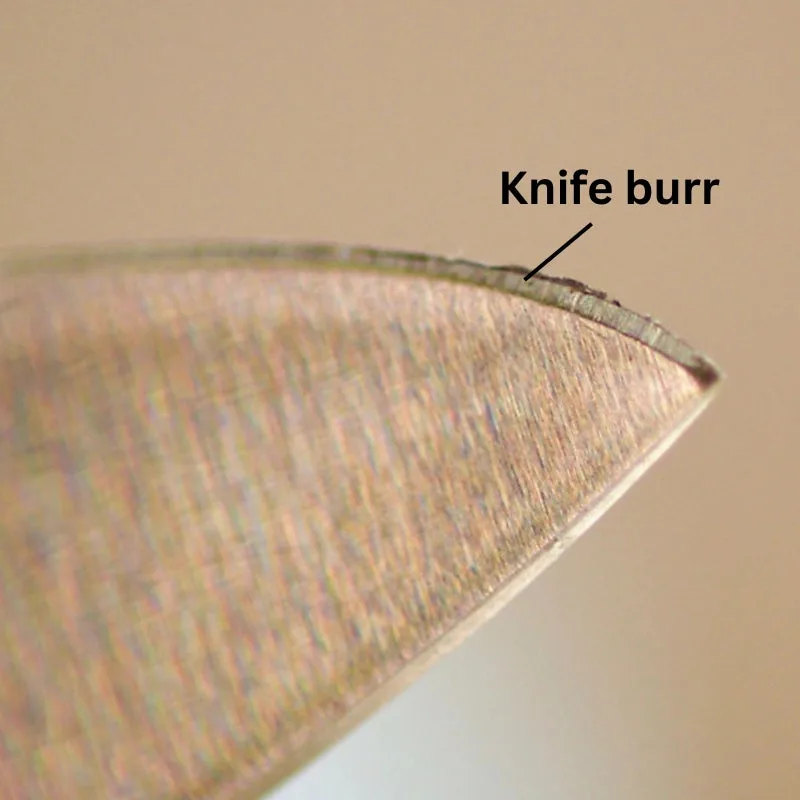
Image source: Bing (Web (fair-use with source credit))
Without the burr, you cannot confirm that the edge is truly reshaped. Many beginners stop before the burr forms and wonder why their knife still feels dull. The burr is the proof.
Step by Step: How to Sharpen a Chef Knife on a Whetstone
This is the method that gives you the best result, but it requires the most setup. Follow these steps exactly.
Setting up your stone and work area
If you are using a water stone, soak it in water for 5 to 10 minutes before you start. The stone needs to be fully saturated. Place the stone on a damp cloth or a non-slip mat.
You do not want it moving while you work.
Finding the angle and starting on the coarse grit
Hold the knife at the correct angle for your blade. Use a marker to color the edge bevel. Take one stroke on the stone and see if the marker is removed evenly.
If not, adjust your angle.
Start on a medium grit stone, around 1000. Place the heel of the blade on the stone and push forward, moving from heel to tip. Keep the angle constant.
Do this 10 to 15 times.
Working through finer grits and raising a burr
After your passes on the medium grit, run your finger lightly along the opposite side of the edge. You should feel a small ridge. That is the burr.
When you feel it along the entire edge, flip the knife and repeat the same strokes on the other side.
Once the burr forms on both sides, switch to a finer grit stone, around 4000 to 6000. Repeat the same process with lighter pressure. This refines the edge and removes the scratches from the coarser stone.
Removing the burr and testing the edge
The final step is deburring. Use very light, trailing-edge strokes where the blade edge is moving away from the stone. Alternate sides for 5 to 10 passes.
The goal is to fold the burr off the edge.
Test the blade on a piece of paper. Hold the paper vertically. Draw the knife through it.
A sharp edge should cut cleanly without snagging.
How to Use Pull-Through and Electric Sharpeners Without Ruining Your Knife
If you choose a pull-through or electric sharpener, the rules are different. The goal is the same, but the technique requires restraint.
Pull-through technique: fewer passes, lighter pressure
Place the knife in the coarse slot. Pull it through gently. Do not push down.
Let the sharpener do the work.
Repeat this 3 to 5 times. Then switch to the fine slot and do 3 to 5 passes. Check the edge.
If it still feels dull, do another set of passes. Do not overdo it.
Electric sharpener technique: letting the machine do the work the right way
Read the manufacturer's instructions. Each model has a specific sequence.
Typically, you start with the coarse stage. Pull the knife through with light, consistent pressure. Do not stop in the middle of a stroke.
The heat generated can damage the edge.
Switch to the fine stage and repeat. Most electric sharpeners recommend 3 to 5 passes per stage.
Checking the edge and knowing when to stop
The biggest mistake with both pull-through and electric sharpeners is over-sharpening. You are removing metal every time you run the blade through. Stop once the edge is sharp.
Test on paper or a tomato skin. If it bites and cuts cleanly, you are done. Put the knife away.
Common Mistakes and Safety Risks: Protect Both Your Knife and Your Fingers
Sharpening a chef knife is a technical skill. It takes time to develop. Even experienced home cooks make errors that can damage the blade or cause injury.
Mistakes that destroy edges and shorten blade life
The most common mistake is using too much pressure. Our research indicates that many beginners push hard, thinking it speeds up the process. The opposite is true.
Heavy grinding removes too much metal and creates an irregular edge.
Another frequent error is skipping the coarse and medium grits. Jumping straight to a fine stone takes much longer to reshape the edge. You end up grinding without progress.
Sharpening too often is also a problem. A chef knife does not need a full sharpening every time it feels dull. Honing on a steel rod realigns the edge.
It preserves the metal. Reserve the stone or sharpener for when honing stops working.
Proper knife handling and work-area safety
Keep the blade edge pointed away from your hands and body at all times. That sounds obvious, but aggregate reviews of kitchen accidents show it is the most overlooked rule.
Place your whetstone on a damp cloth or a non-slip mat. A shifting stone is dangerous. Your fingers can slide forward onto the edge.
Wear a cut-resistant glove if you are nervous. It is a cheap investment that protects your hand while you learn the motions.
How to test sharpness safely
Do not run your finger along the blade edge. That is a quick way to get cut. Instead, use a piece of paper.
Hold it vertically and draw the knife through it. A sharp edge cuts cleanly. A dull edge tears the paper.
You can also test on a ripe tomato. Touch the blade to the skin and pull gently. A sharp knife bites in immediately.
A dull knife crushes the tomato.
When to Skip DIY Sharpening and Call a Professional
Not every knife is a good candidate for home sharpening. Some conditions require a professional grinder who can fix deeper issues.
Knives that are chipped, bent, or badly worn
If your blade has visible chips along the edge, you need to remove significant metal to reshape it. Doing that with a whetstone takes hours. A professional belt grinder can restore the profile in minutes.
Bent tips are also tricky. Straightening a bent tip requires heating and careful reshaping. That is not something you can do with a stone or a pull-through sharpener.
Ceramic knives and specialty blades that need expert hands
Ceramic knives are extremely hard and brittle. Standard whetstones and electric sharpeners cannot grind them effectively. Diamond abrasives are required.
Even then, one wrong angle can chip the blade.
If you own a ceramic chef knife, send it to a professional who uses diamond wheels. Check the manufacturer's website for recommended sharpening services.
What to expect from a professional sharpening service
Professional sharpening typically costs a few dollars per inch. The service includes inspecting the blade, restoring the edge geometry, and polishing the finish. Turnaround time is usually a few days.
Call ahead and ask what edge angle they use. Some services default to 20 degrees. If your knife requires 15 degrees, confirm that they can accommodate it.
A mismatch ruins the blade's intended performance.
Frequently Asked Questions
Can I sharpen a serrated knife with a chef knife sharpener?
No. Serrated blades require a special tapered rod that fits into each scallop. Pulling a serrated knife through a straight slot or across a whetstone destroys the serrations.
Use a dedicated serrated sharpener or a ceramic rod for each tooth.
How often should I sharpen my chef knife?
It depends on how often you use it. For a home cook who cooks daily, a full sharpening every two to three months is typical. In between, use a honing rod weekly to realign the edge.
You will need to sharpen more often if you cut on hard surfaces like glass or bamboo.
Do I need to soak my whetstone?
Only if it is a water stone. Soak it for 5 to 10 minutes before sharpening. Some stones are splash-and-go.
They do not need soaking. Check the manufacturer's instructions. Diamond plates and oil stones do not require soaking at all.
Is a honing rod the same as a sharpening stone?
No. A honing rod realigns the edge without removing metal. A sharpening stone grinds the edge to reshape it.
They serve different purposes. Use the rod weekly. Use the stone when the edge feels dull after honing.
Can I use an electric sharpener on a high-end Japanese knife?
It is risky. Japanese steel is hard and brittle. Electric sharpeners generate heat that can affect the blade's temper.
They also remove metal aggressively. If you do use one, choose a model with a slow speed and a fine grit stage. The safest option is a whetstone.